 |
||
 |
||
 |
||
 |
||
 |
||
 |
||
 |
||
 |
||

Orion Convection Cooker |
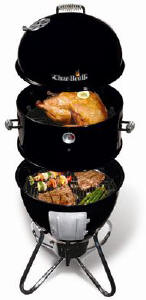
Masterbuilt Smoker
|
||||||||||||||||||||||||||||||||||||||||||||||||||||
 If you're like me
and like to fiddle with things, this page is for you. You could buy
a BBQ, bring it home, assemble it and fire it up. It will work just
fine in most cases. You will notice over time that things may not be
a functional as you'd like. For instance there seems to be a lot of
smoke escaping from around the lid, or things don't cook easily.
Take it a step further and maybe you'll wonder if you're losing a
lot of heat from the vent and could it be more efficient? While
these modifications apply to specific cookers, they should give you
some ideas about how you can improve what you use.
If you're like me
and like to fiddle with things, this page is for you. You could buy
a BBQ, bring it home, assemble it and fire it up. It will work just
fine in most cases. You will notice over time that things may not be
a functional as you'd like. For instance there seems to be a lot of
smoke escaping from around the lid, or things don't cook easily.
Take it a step further and maybe you'll wonder if you're losing a
lot of heat from the vent and could it be more efficient? While
these modifications apply to specific cookers, they should give you
some ideas about how you can improve what you use.|
|
|
|
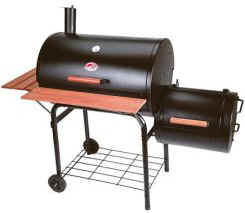
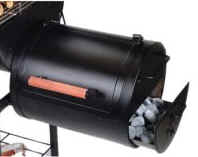
General Information I was initially interested in this smoker because of the solid construction, cast iron grate, and the fire box for offset smoking. It is a heavy piece of metal to move around and put together. Over time I've found myself using it less and less unless I need a large cooking area. It isn't terribly efficient and seems to consume a large amount of briquettes to keep the temperature constant. I find myself using the upright barrel type smokers more often because of their size and efficiency. |
|
|
Setup and Seasoning It took awhile to put this monster together due to the heavy metal. It helps to have two people, especially when adding the firebox. Seasoning is pretty standard using lots of vegetable oil on the interior and metal grates. I found through trial and error and reading some of the links below in the modification section that the performance and efficiency could be improved. These changes helped a lot in the charcoal consumption, but due to the large surface area, a lot of heat is lost in both the firebox and main body of the smoker. |
|
|
Smoking This smoker does a good job at smoking large amounts of meat. I've put two turkeys on at once. I found that rotating them is a good idea as one side is hotter closer to the firebox. It really isn't worth firing it up for a chicken or a pork loin. I use one of the smokers below that is more efficient. You definitely need the modifications below to make this a good smoker. Smoke is added by tossing a small amount of pre soaked wood chips to the charcoal. |
|
|
Barbequing, Rotisserie & Grilling The Char-Griller Pro does a good job of barbequing and grilling using the suspended adjustable coal grate. If you're cooking for a lot of people doing hot dogs and hamburgers, the surface area works well. Chicken can also be done, but requires more attention and adjustment of the grate level and coal position. I purchased the rotisserie attachment for the Pro (I don't believe this is sold anymore which probably says something about it). It works well in general, but the motor is a bit weak and struggles with larger things like turkey. The heat is difficult to control if you're using the grate below and flare-ups are a problem. Overall, I don't think it is worth the money unless you are really willing to play with it. |
|
|
Purchasing Information I've seen these units at several local stores including Lowes. They are often on sale as either a package of Pro and Firebox or separately. Due to the weight, it is better to buy locally to avoid painful shipping costs unless you can get free shipping. Amazon's price is normal for the Pro, although their prices on the Side Fire Box is about twice as high as it should be. You can purchase from the Char-Griller site, but the shipping is higher than Amazon (usually free on large purchases). |
|
| Top | |
|
|
|
|
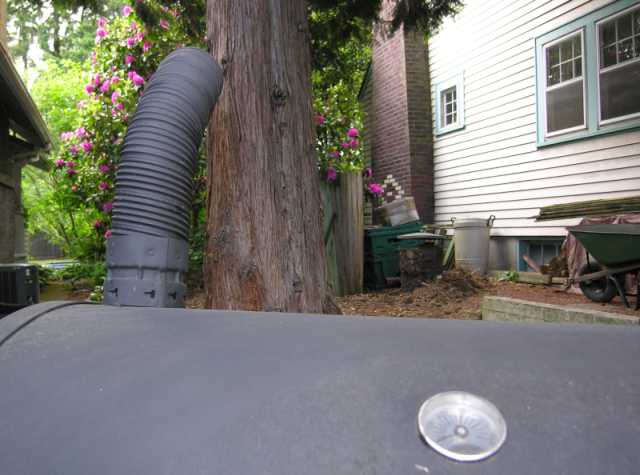
Modifications Here are some links and photos of modifications you can make to your pit to make it more efficient. These are based on the Char-Griller Smokin' Pro |
|
|
|
|
|
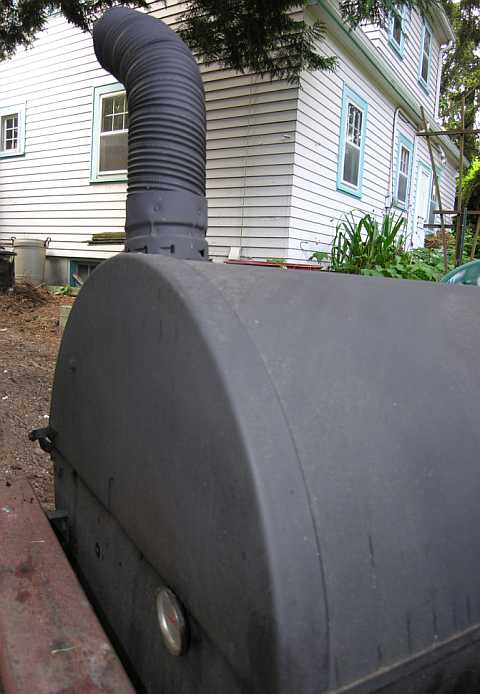
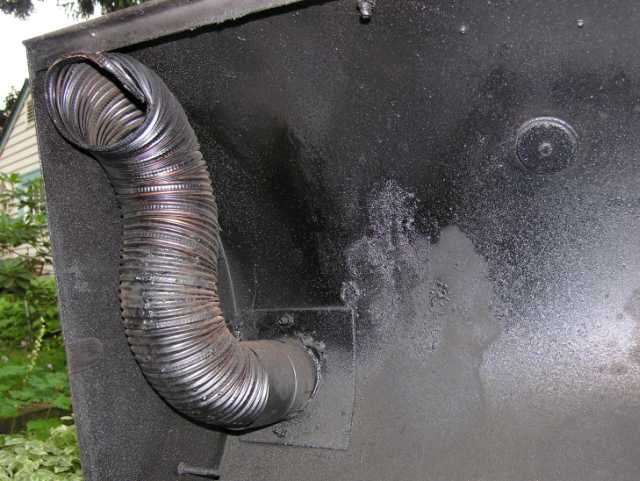
Another option
would be to drill and cut a hole in the side opposite the firebox below
the grill level and attach
vent pipe running up from there. You'll have to stabilize
the
vent pipe well as it has nothing to attach to above the
lower section. |
|
|
Some people recommend turning the charcoal tray over in the main body of
the pit, and let it act as a baffle. I have not seen a big difference when
doing this, but I'll try it a few more time. (still no difference)
I've cut a piece of sheet metal to rest just above the firebox opening in
the main body of the pit. I bent one edge to provide some rigidity. I then
drilled a series of holes in a triangle pattern increasing in quantity as
you go further from the firebox. This allows more air to flow through as
you go further from the box. It deflects much of the heat towards the
middle and avoids a strong hotspot at the opening. It remains to be seen
how effective this is. (I've removed it as it didn't help much) |
|
|
I have had good luck with lining the inside of the lower section with
heavy foil and adding two bricks set on their side with a foil drip pan.
This does several things. Reflects the heat back from the lower area.
Makes for easy cleanup. The bricks retain heat and keep the interior
temperature more stable (I've also heard of adding ceramic briquettes for
the same purpose). The drip pan sits up a bit higher and acts as a baffle. |
|
|
Use some sort of
charcoal basket
|
|
| Top | |
|
|
|
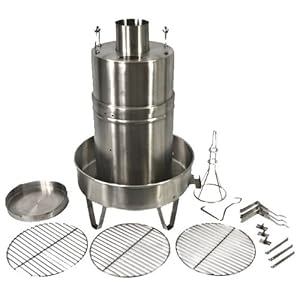
Orion 101 Convection Cooker
Review & Modifications
|
|
|
|
General Information The Orion Convection Cooker, uses indirect heat to produce convection current within the cooking cylinder, produces amazingly fast cook times, moist tender meat and worry free cooking, 100-percent stainless steel. Unit is heated by charcoal, no expensive fuels or hot oil is used. Smoke flavor comes from wood chips placed at the inside bottom of the cooking cylinder.
|
|
|
Setup and Seasoning Just picked this unit up so more info is coming soon |
|
|
Smoking Smoke flavor comes from wood chips placed at the inside bottom of the cooking cylinder. Since you don't want to open the cooking cylinder while cooking, I assume you need to add a larger amount to generate sufficient smoke throughout the process. |
|
|
Barbequing Coming Soon |
|
|
Grilling This doesn't appear to be a good function of this cooker. |
|
|
Purchasing
Information |
|
| Modifications The only mod so far is drilling three holes in the side to run a barbeque thermometer probe through. You can cover the holes with tabs of high temperature flue tape |
|
| Top | |
|
|
|
Masterbuilt Smoker
Review & Modifications
|
|
|
|
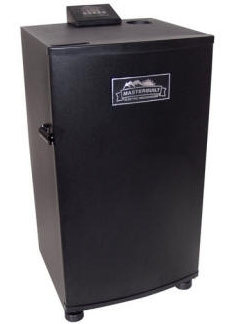
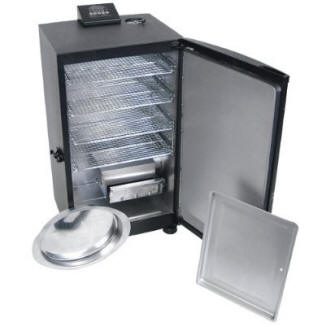
General Information This Masterbuilt Smoker Pushbutton Start The smoker's simplicity starts with its intuitive pushbutton digital control panel, which includes temperature settings that range from 100 to 275 degrees F. Easy to set, the temperature is remarkably consistent, so your food comes out exactly the way you expect. In addition to the thermostatically controlled heat, all walls in the smoker are 100-percent insulated for energy-efficient, even cooking. No more overcooked meat on one side and half raw meat on the other. Plus, the control panel includes a 24-hour timer with an automatic shutoff, so food is never overcooked or dry. Slow Smoking as Easy as Grilling The smoker is spacious inside, with four interior smoking racks that offer more than 730 square inches of combined cooking surface. As a result, you'll have ample room for your ham, fish, sausage, chicken, or jerky--enough to feed extra-large crowds on special occasions, holidays, and family reunions. Also, you needn't bother opening the door to add more wood chips, as the smoker offers an easy-to-use side wood chips loader. Simply fill the loader with your favorite wood chips, slide it into the side of the smoker, and watch it smoke. Spice Up Your Barbeque The smoker lets you add juice, vinegar, or your favorite beverage to the removable water pan to infuse moisture and add another layer of flavor to your food. For a milder flavor, you can use the adjustable air damper to decrease the smoke level. Robust flavor lovers can instead leave the air damper closed to intensify the smoke levels inside. And the bottom of the smoker is lined with a removable drip tray to catch the drippings, which add just the right touch to any gravy or sauce. Plus, the drip tray makes cleanup easier than ever.
|
|
|
Setup and Seasoning Cleaned all the metal parts with white vinegar and then soap and water. Ran it up to full heat (275). Seemed to take awhile. About 2 hours with the air temperature at about 60. Loaded the smoke tray and let it run for an hour. |
|
|
Smoking First time out I brined and then dry rubbed two chickens. There is more than enough room. I could probably put at least 4 chickens in the available space. I filled the smoke tray twice with wood chips during the 4 hours using the convenient side loading wood chip loader. I used my barbeque thermometer after about 3 hours to monitor the meat temperature. It sits easily on top and the door closes easily over the cord with no problems. When it hit 170, I pulled them out and let them rest. They were done perfectly, meat still firm, but close to falling off the bone. Good smoke flavor that was even stronger on the leftovers the next day. 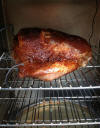
 Second test was with a pork picnic roast. I used a basic pork brine
(water, salt, brown sugar, garlic) for 12 hours and then some basic pork rub Second test was with a pork picnic roast. I used a basic pork brine
(water, salt, brown sugar, garlic) for 12 hours and then some basic pork rubUpdate: The temperature seems to be running about 10 degrees low from the relatively accurate thermometer. I set the digital temperature to 220. I'll continue to monitor. |
|
|
Barbequing Not relevant with this unit |
|
|
Grilling Not relevant with this unit |
|
|
Purchasing
Information
Modifications |
|
| Modifications The only mod so far is drilling three holes in the side to run a barbeque thermometer probe through. You can cover the holes with |
|
| Top | |
|
|
|
Char-Broil Double Chef
Smoker
Review & Modifications
|
|
|
|
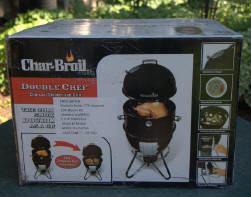
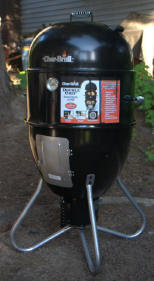
General Information This model appears to be discontinued, but you can still get some parts. I spotted this smoker at a local store and it caught my eye because it looks like the Big Green Egg in shape. The Big Green Egg is a ceramic smoker that costs an arm and a leg, but produces good results. I've considered it, but the ceramic is fragile, especially in a wet climate with big temperature swings. What looked attractive was the shape that allows heat to rise to the large surface area. The sections come apart for different configurations allowing grilling with close contact to the coals, barbequing allowing some distance and smoking with a water pan. When I first saw it in the store I looked it over carefully, took a picture with my Blackberry and then did some research on the web. I couldn't find any reviews so it must be a fairly new product. I decided to take the plunge and buy it as my Brinkmann smoker was getting a bit long in the tooth.
|
|
|
Setup and Seasoning The primary selling points were the larger cooking area (much larger than most barrel smokers), legs, raising the smoker higher off the ground, the removable ash catcher to allow for easy removal during long smoking sessions, a tight fitting lid with a vent for less heat loss. Write down the model and serial number before using the grill. They are on the front of the silver door. I left the larger sticker on the grill and brushed it with vegetable oil. Once the smoker was hot, it pealed off easily. Venting is controlled in the ash catcher on either side and in the lid. The only problem I can see with this setup is the loss of smoke through the top vent. If this proves to be troublesome, I'll look at running a pipe or some other mechanism down to the food surface to trap the smoke. (see modifications above on the vent pipe of the Char-Griller). Another issue is that the water pan sits quite close to the coals, The water seemed to boil away much faster than in the Brinkmann smoker. When you open the side door, the water pan is partially blocking the opening. Perhaps placing the water pan on top the grill surface instead of beneath it will help in both respects. Setup is slow, but not difficult. All you need is a Phillips head screwdriver and a adjustable wrench. The directions don't exactly match up to the parts. The larger brackets go lower on the smoker. Prepping the smoker is covered in the instructions. I coated the inside of the smoker and the grill surface with vegetable oil. I did not put in the water tray as per the directions. I started about 20 briquettes in a coal starter and put them into the charcoal grate. I left the vents on full open and let it sit for about an hour and a half. I added about 10 more new briquettes and was pleasantly surprised to see they caught well and raised the temperature visibly. I let the coals burn out over night. In the morning, most of the ash was in the ash catcher and I brushed the rest down the holes beneath the grate into the catcher. |
|
|
Smoking First off this unit is very efficient in charcoal consumption. I can smoke a large turkey on essentially a half a bag of charcoal or less. I start the coals in a coal starter and after that toss in about 6-8 briquettes every hour to keep the heat up. It is a visual check by opening the side door. If the coals are looking low, I toss some in. I took the smoker out on its first run using pork chunks in a Chinese BBQ Pork sauce. Nothing special, I just happened to have all the ingredients at hand. I skipped the red food coloring as I am not sure why it is that color in the first place and doesn't add to the flavor. I soaked the pork for about 2 hours in the marinade. I also presoaked some apple wood chips. I filled a coal starter about 3/4 full and lit them. When they'd turned white I emptied the coals from the top into the coal grate. I filled the water pan with warm water and put it on the lower brackets. This was a bit touchy as the coals were putting out some heat and I was trying not to slosh the water onto them. Perhaps putting the tray in empty and adding water would be better. I did not put the cooking grate over the water pan as it would just get dripped on and not serve any purpose. I put the middle section in place and placed the cooking grate on the upper brackets I then put the lid in place to allow the temperature to get stabilized. I took the meat out of the marinade and place them on the upper cooking grate. I placed a probe into the largest piece of meat and plugged it into my barbeque thermometer base. This is where I ran into a bit of an issue. Because the lid fits over the rim of the middle section, the cord to the probe didn't allow the lid to fit tightly. I drilled a hole in lid to allow the probe to pass through without compromising the lid seal. After replacing the lid, I added some presoaked apple wood chips through the side door. Because the water pan hangs down, it is difficult to distribute the chips. Either raising the pan or using a container of chips would work better. I continued to add wood chips at about half hour intervals. Cooking time was about 2-2 1/2 hours until the pork reached 150 degrees. I did not add any additional briquettes to the original amount. The heat remained constant according to the temperature gauge on the smoker, and was just starting to drop when the meat was done. I was impressed with the efficiency of the smoker. I will check the temperature gauge against one of my temperature probes to see where the optimum smoking level falls. |
|
|
Barbequing Again a very efficient use of charcoal. You can barbeque at the higher grill level and avoid scorching. No problems whatsoever. |
|
|
Grilling The lower grill is far enough from the coals that scorching is reduced while still keeping a high temperature. The grill is large enough to do a good amount of meat. |
|
|
Purchasing
Information |
|
| Modifications The only mod so far is drilling a hole in the lid on the left side fairly low to run a barbeque thermometer probe through. This works well as the lid is a tight fit and running a probe under it compromises the seal.
I also tightened things up on the
door latch as it was coming loose. |
|
| Top | |
|
|
|
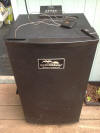
Brinkmann
Gourmet Charcoal Smoker and Grill
Review
|
Brinkmann Gourmet Charcoal Smoker and Grill with Vinyl Cover, Green Wood chips can be added through the front door which gets quite hot so watch your fingers when opening it. As a grill it works about the same as the Smokey Joe below. You just remove the barrel and put the lid on the lower section. You can use less coals and it does an adequate job. It is very low to the ground and bending over is a pain. Overall this smoker works well and I've done some nice smoking on it. |
|
| Top | |
|
|
|
Weber Smokey Joe Charcoal
Grill
Review
|
Weber Smokey Joe Charcoal Grill |
|
| Top | |
|
|
|
Cameron Stovetop Smoker
Review
|
|
|||||||||
|
The
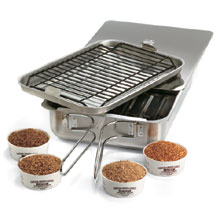
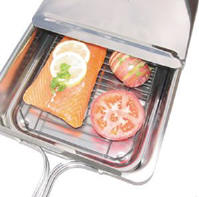
Cameron Stovetop Smoker The Stovetop Smoker This smoker does an excellent job with meat and many other foods. Salmon has to be one of the best options with either alder or cedar wood. Asparagus is very nice with some smoke flavor as is cheese. Experiment with cooking initially on the smoker and finishing the food on a traditional cooker as well. Options include adding some smoke flavor to a roast before finishing in a crock-pot. Throw some burgers on the smoker for 5 minutes and then finish in a pan or grill. Also experiment with different amounts of moisture to add steam or a dryer smoke depending on the food. The best process for cooking with the Stovetop Smoker:
Tips:
|
|
||||||||
| Top | |||||||||
|
|
|||||||||